If you need more help, we’re at the other end of the phone, so please don’t hesitate to call.
As a general rule, residential HydroTap filters should be changed annually. Commercial HydroTap filters should be changed at least every six months, or dependent on use.
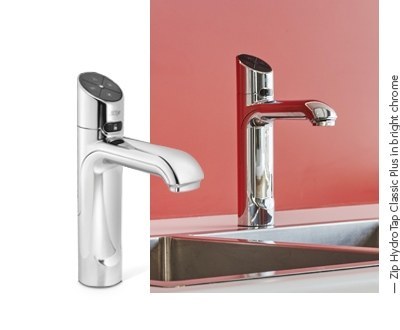
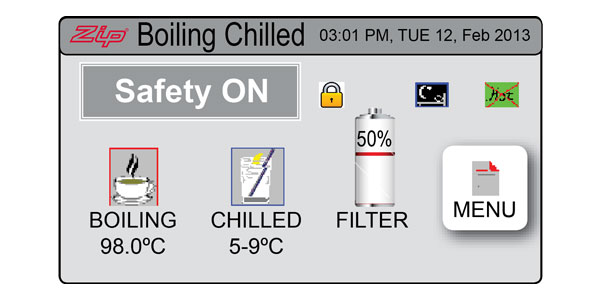
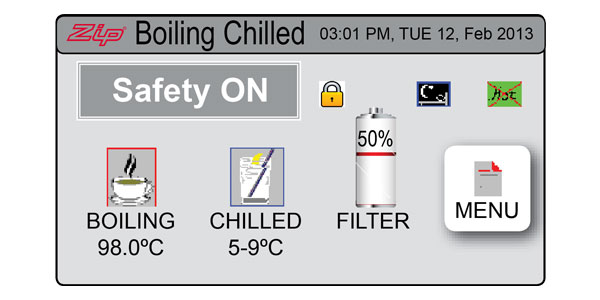
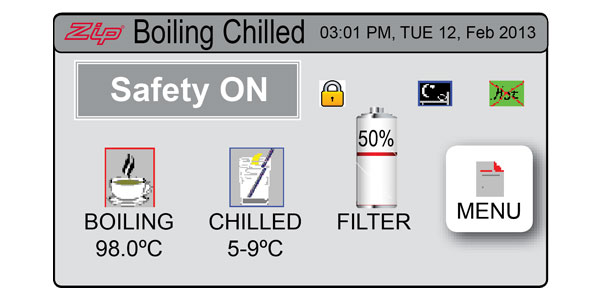
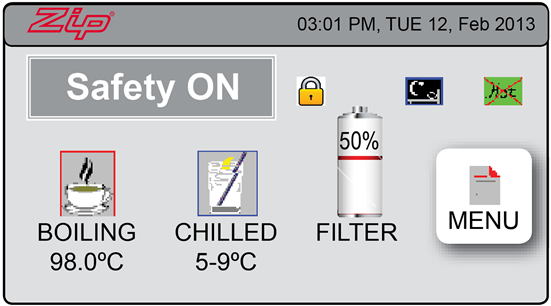
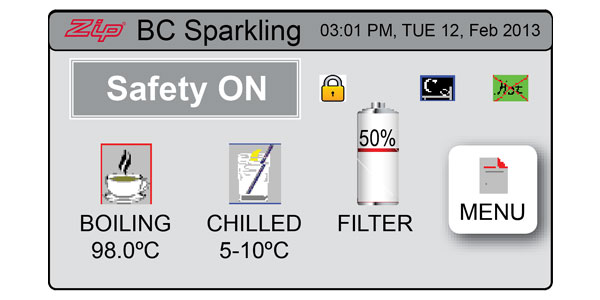
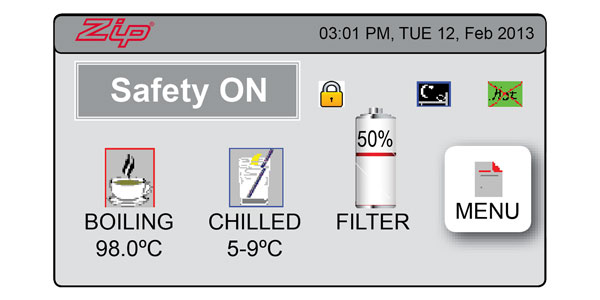
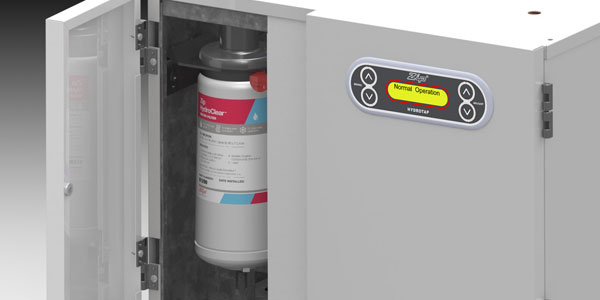
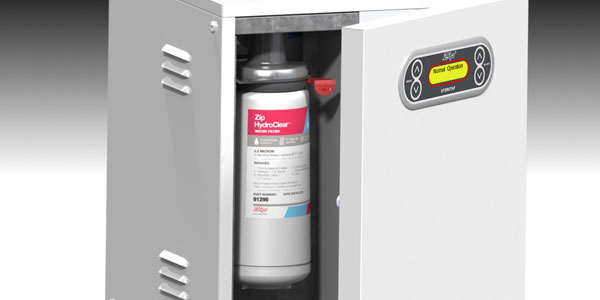
Your Zip HydroTap will notify you when the filter replacement is due. The change filter light will flash white once per minute until the filter has been replaced, and the filter percentage will show 0% on the Home screen. To order a replacement filter, either order from the zipwater.co.uk website or call 03456 005 005.
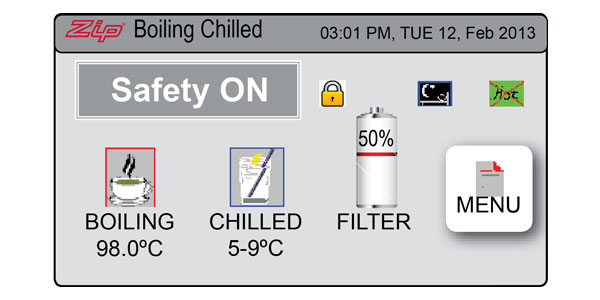
This indicates that the boiling water is below the desired temperature.
Wait for the light to stop flashing before dispensing water.
The flashing light will typically occur after switching on, or coming out of sleep mode.
If chilled capacity is reached, the HydroTap will stop dispensing chilled water and the blue light will flash, indicating that the water is not at set temperature.
Wait for the blue light to switch to solid, indicating the water is at the correct temperature, before using the chilled water function.
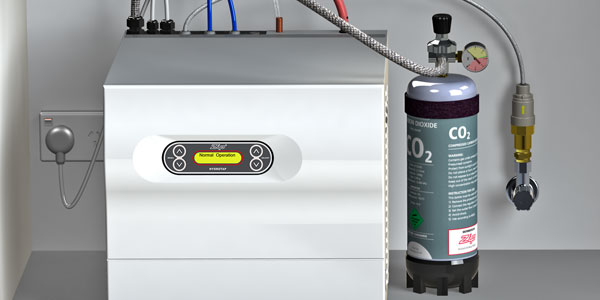
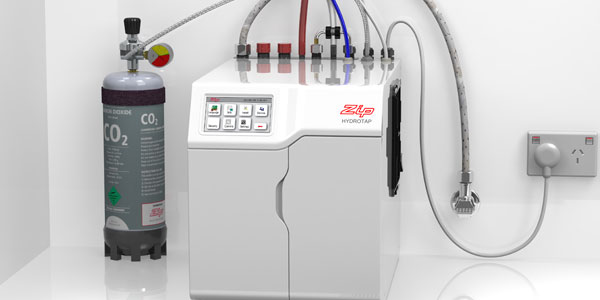
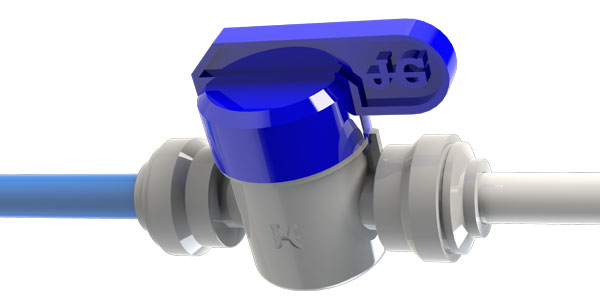
If you have a HydroTap that delivers sparkling water, you will need to replace the CO2 canister when it runs out.
Order the ZT400 Zip Sparkling Replacement Cartridge online or over the phone.
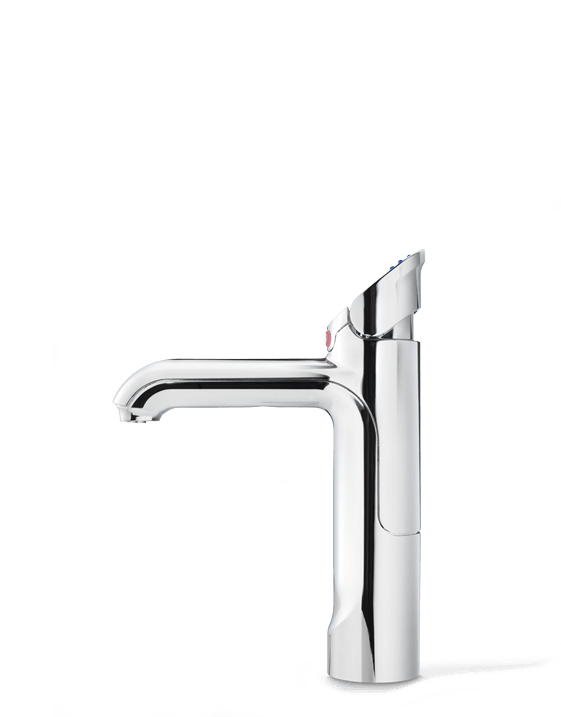
Boiling water

A unique safety lock eliminates the risk of accidental discharge of boiling water.
Press both the red lever and the “safety” button at the same time for access to boiling water.
To deactivate the safety button, hold the chilled lever and safety button for 10 seconds until the safety button turns off, it is now disabled and you can have boiling water access by simply depressing the red lever. For boiling only units see instructions here.
Repeat the process to reactivate the safety button as required.

Hands Free
Flick the red lever towards you and boiling water will run for any pre set period of 5-15 seconds.
Chilled or Ambient water

Press the blue lever to dispense either chilled or Ambient filtered water, depending on which model of HydroTap you are using.

Hands Free
Flick the blue lever towards you and a set limit of 700ml of chilled or ambient water will run which is especially useful for filling water bottles or carafes. To find out how to adjust this setting, click here.
How to turn the G4 HydroTap off and on, before and after a holiday
To Turn OFF
Step 1: Turn the water off at the supply to the G4 Command Centre.
Step 2: Depress each lever on the HydroTap three or four times until the water stops. This will empty the tanks.
Step 3 [Commercial model]: Turn off power supply at the power point.
Step 3 [Residential model]: Turn off power supply using the power switch on the back right hand side of the Command Centre or the power point .
To Turn ON – HydroTap Boiling|ChilledHave a bucket or container handy plus a towel to mop up any spills.
Step 1: Turn on water supply at supply point. Turn on power supply at power point. Note: any programmed times will be retained via the battery backup and will not need to be re-set.
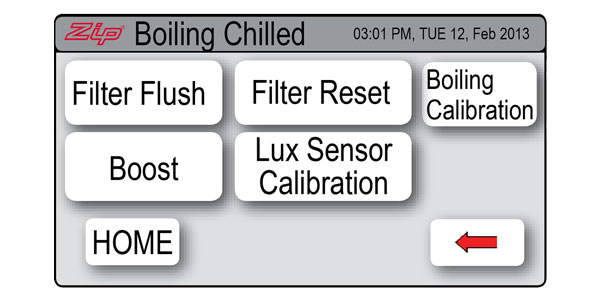
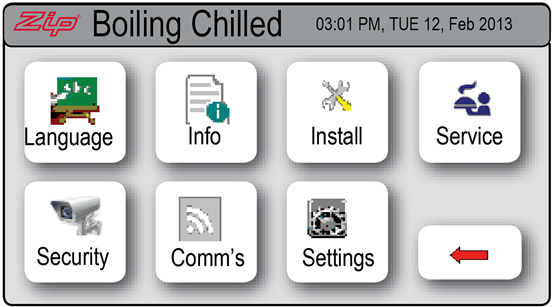
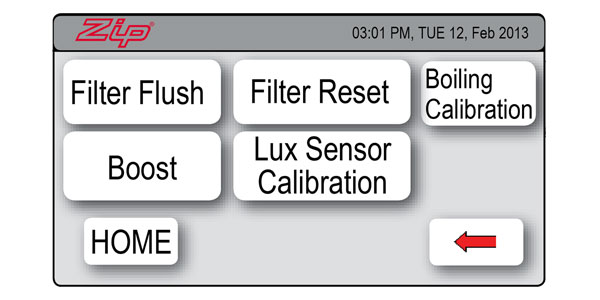
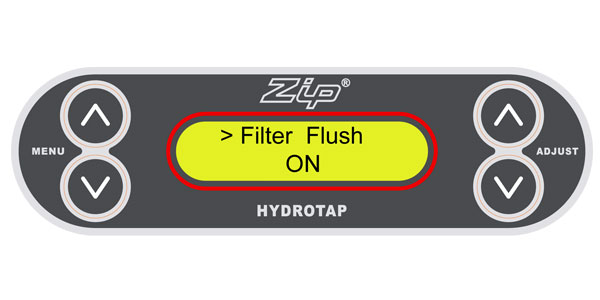
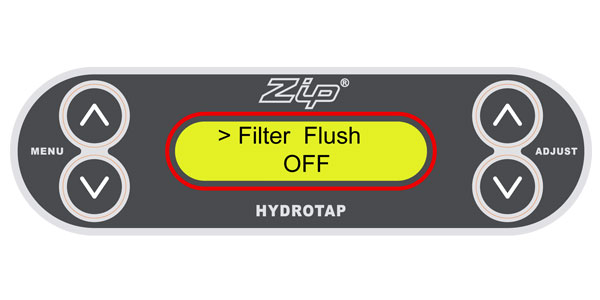
Step 2: On the LCD screen, select [MENU] then [Install] and then [Filter Flush].


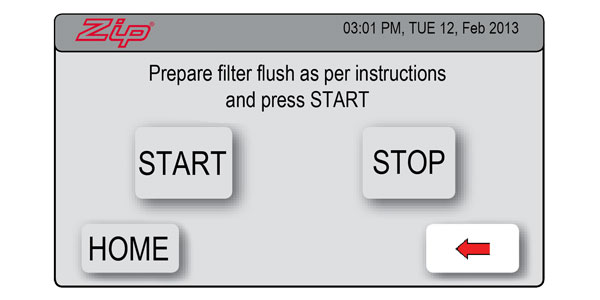
Step 3: Open the filter flush stop valve and ensure the end of the hose is in a bucket or sink.

Step 4: Then select [Filter Flush START]. This will start the flow of water. Flush for 30 seconds to remove any water sitting in the filter cartridge.

Step 5: When the Filter Flush is finished, turn the stop valve to OFF by rotating the lever anti-clockwise until it is 90° to the hose. Replace the hose into the filter compartment.

Step 6: Press [Filter Flush - STOP] to end the filter flush process. Use the [Home] key to exit the Flush Menu. Wait for lights on tap to stop flashing and the unit will be ready for use.
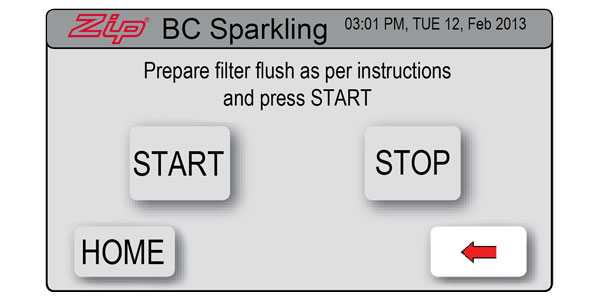
To Turn ON – HydroTap Boiling|Chilled|Sparkling
Have a bucket or container handy plus a towel to mop up any spills.
Step 1: Turn on water supply at supply point. Turn on power supply at power point. Note: any programmed times will be retained via the battery backup and will not need to be re-set.
Step 2: On the LCD screen, press [MENU] then [Install] then [Filter Flush].


Step 3: Open the filter flush stop-valve and ensure the end of the hose is in a bucket or sink.

Step 4: Then select [Filter Flush START]. This will start the flow of water though the flush hose. Flush for 30 seconds to remove any water sitting in the filter cartridge.

Step 5: When the Filter Flush is finished, turn the stop-value to OFF by rotating the lever anti-clockwise until it is 90° to the hose. Return the hose into the filter compartment.

Step 6: Press [Filter Flush STOP] to end the filter flush process. Use the arrow key to exit the Flush Menu.

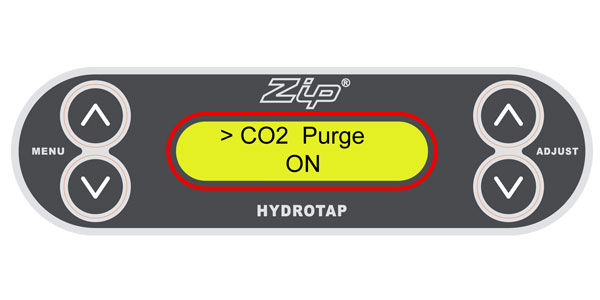
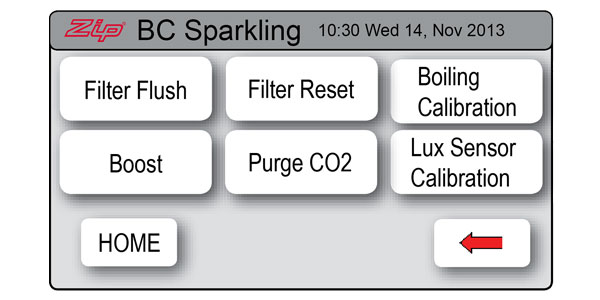
Step 7: Select [Co2 Purge].
Step 8: Select [Co2 Purge ON]. This will push Co2 and water through the HydroTap’s system.

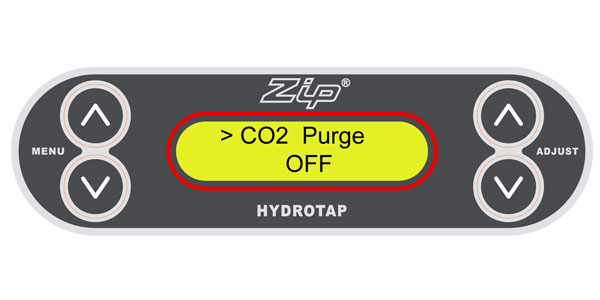
Step 9: Let the Co2 flow until the water has finished and only Co2 is being dispensed from the tap. Leave the Co2 flowing for 5-10 seconds longer then press [Co2 Purge OFF] on the LCD screen.

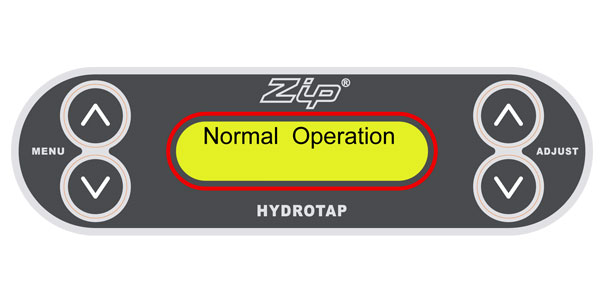
Step 10: Exit by selecting the home screen.
The default setting for the dispense time is 15 seconds but this can be adjusted to any time in between 5 and 15 seconds in increments of one second.
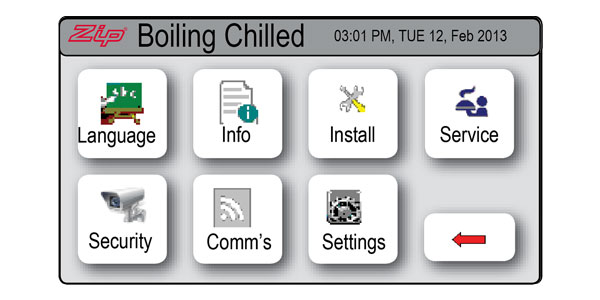
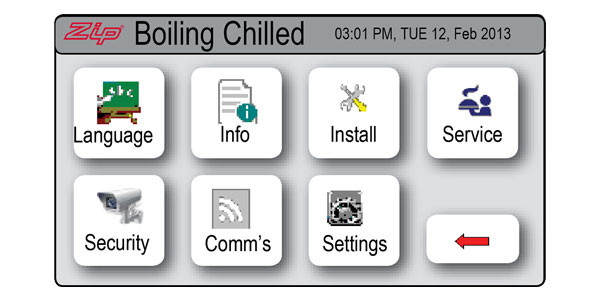
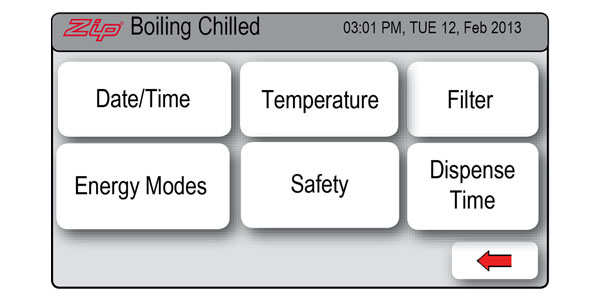
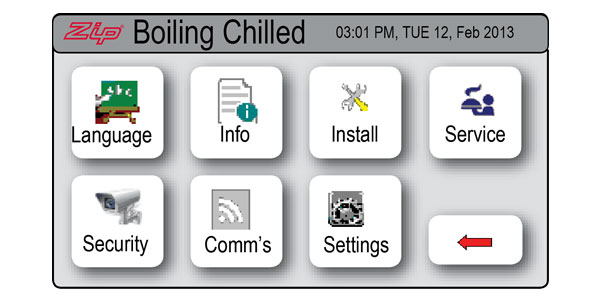
Step 1: Select [MENU] to bring up the main menu.
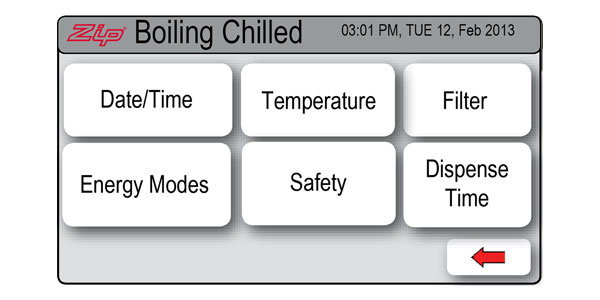
Step 2: Select [Setting].
Step 3: Select [Dispense Time].
Step 4: Use the Up and Down arrow keys to select the time required.

Step 5: Select [Home] to return to the main menu. Your selection has now been made.
It is a good idea to recalibrate the sensor once you have selected any of the Lux sensor options from the sleep mode menu. For best results calibrate the sensor while the area is well lit.
Step 1: Press the [MENU] button to bring up the main menu.
Step 2: Press the [Install] button.
Step 3: Press the [Lux Sensor Calibration] button.
Step 4: Check the lights on the tap head are flashing to confirm the calibration.
Step 5: Select [Home]. The sensor has now been calibrated.
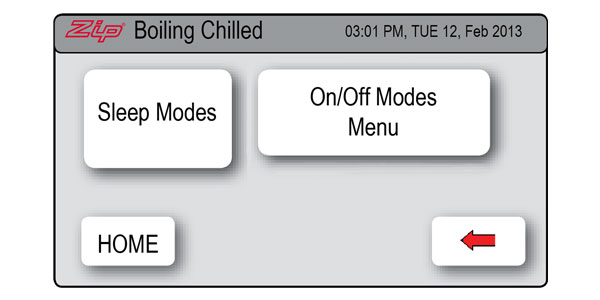
Energy modes are used to help the HydroTap G4 save energy. There are two options available: “Sleep” mode and “On/Off” mode.
• In “Sleep” mode the unit will power down after a period of inactivity. You will know the unit is in this mode when the home screen status window says “Sleep Mode”.
• In “On/Off” mode you can set the unit to turn on or off at a particular time.
How to activate “Sleep” modeStep 1: Press the [MENU] button to bring up the main menu.
Step 2: Press the [Setting] button.

Step 3: Press the [Energy Modes] button then press the [Sleep Modes] button.
Step 4: In the “Sleep Modes” screen you will see seven “Sleep Mode” options listed. Use the Up and Down arrows to select the mode you wish to set.
Option1: (2 Hours/68˚C) Boiling water temperature will gradually drop to 68˚C after 2 hours of inactivity but the chiller will remain ON.
Option 2: (2 Hours/OFF) Boiling and chilled water temperature will gradually drop to room temperature after 2 hours of inactivity. The boiler and chiller will remain OFF*.
Option 3: (Lux Sensor/68˚C) Boiling water temperature will gradually drop to 68˚ when the unit senses it has become dark in the room. For more on this option, refer to the Lux Sensor calibration section.
Option 4: (Lux Sensor/OFF) Boiling water temperature will drop gradually to room temperature when the unit senses it has become dark in the room and the boiler will remain OFF*.
Option 5: (Lux or 2Hr/68˚C) When the room becomes dark, Option 3 will be activated. At all other times Option 1 will be automatically activated. For more on this option, refer to the Lux Sensor calibration section.
Option 6: (Lux or 2Hr/OFF) Boiling water temperature will gradually drop to room temperature and the boiler will remain OFF*.
Option 7: (Disable) The “Sleep mode” function will be disabled. If this option is selected and no on/off times are set in the “On/Off” mode, the boiling circuit will be switched ON continuously and the HydroTap will operate 24 hours/7 days.
*Note: If the unit is in OFF mode you can “wake” it up simply by dispensing water. The unit will automatically return to the selected sleep mode after 2 hours of inactivity. You will need to allow enough time for the water to come back to your selected temperature after you “wake” it up.
Lux Sensor calibration
It is a good idea to recalibrate the Lux Sensor once you have selected any of the Lux sensor options from the sleep mode menu. Click here for instructions.
How to activate “On/Off” mode
If you wish to use the “On/Off” mode you must also set your current date and time. Click here for instructions on how to set the date and time.
Step 1: Press the [MENU] button to bring up the main menu.
Step 2: Press the [Setting] button.
• If you have set a password via the security button, you will be prompted to enter it now.
• If you have not set a password via the security button, you will proceed straight to the Settings menu.
Step 3: Press the [Energy Modes] button.

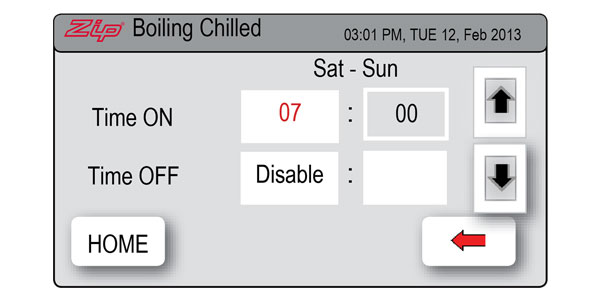
Step 4: To select the on/off mode that suits you best:


Select “Individual set” if you wish to set a specific time for each day. Note: only one On/Off period is allowed for each day.
Or
Select “Group Set 1” if you wish to set the same time for all 7 days of the week.
Or
Select “Group Set 2” if you wish to set the same time for all 5 work days (Monday to Friday) and other times for the weekend (Saturday and Sunday).
Step 5: Use the [On/Off Modes] button to set the on and off times for each day or group of days.
Note: If the unit is in OFF mode you can “wake” it up simply by dispensing water. The unit will automatically return to the selected energy mode after 30 minutes of inactivity.
The time on your Zip HydroTap G3 is displayed in 24-hour time.
Step 1: Press the [Menu ^] button until you see “Set Time” on the display screen.

Step 2: Press the [Adjust ^] button to increase time or [Adjust v] button to decrease time in increments of one minute. If you hold the [Adjust] button down, the time will increase or decrease more rapidly.
Step 3: Press the [Menu ^] button until you see “Set Day” on the display screen.
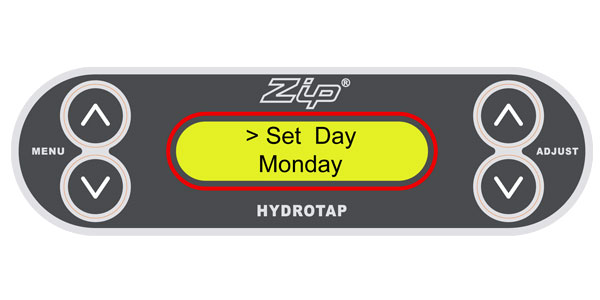
Step 4: Press the [Adjust ^] button or [Adjust v] button to select the correct day of the week.
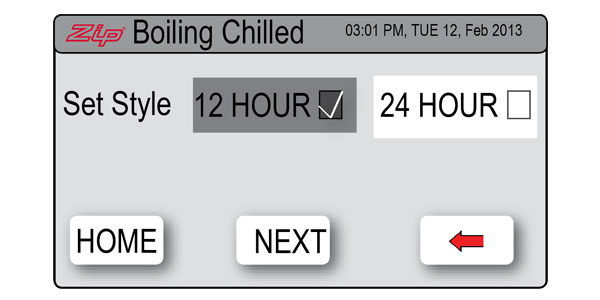
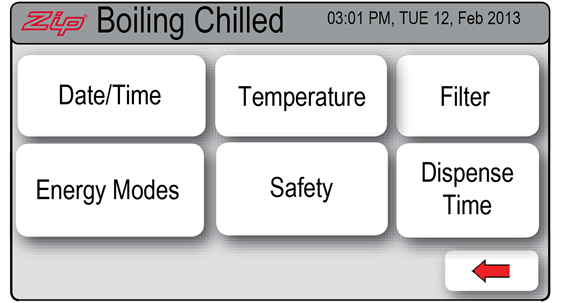
Step 1: Select [MENU] to bring up the main menu.
Step 2: Select [Setting]
Step 3: Select [Date/Time]
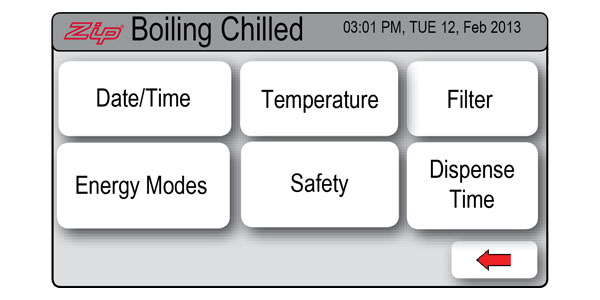
Step 4: Select either 12-hour mode or 24-hour mode. The selected mode will be displayed in a dark grey colour with a tick box to the right.

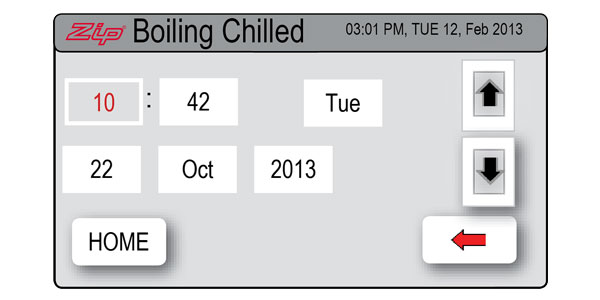
Step 5: Select [NEXT] to select the current date and time.

Step 6: Press the [HOME] button to return to the main menu. Your date and time are now set.
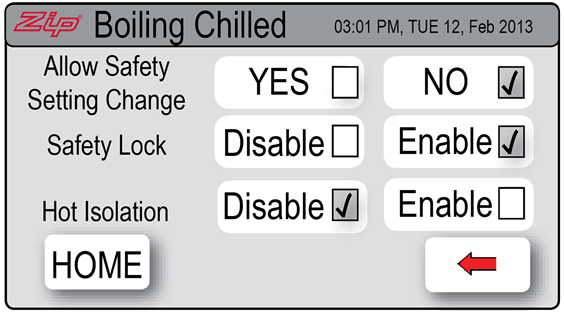
Step 1: Press the [Menu] button to bring up the main menu
Step 2: Press the [Settings] button
Step 3: Press the [Safety] button
Step 4: At the top of the screen, select "Yes" to allow the safety settings to be changed
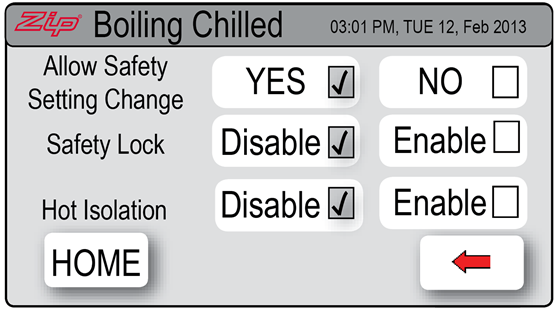
Step 5: On the second line down, next to "Saftey Lock", select "Enable"
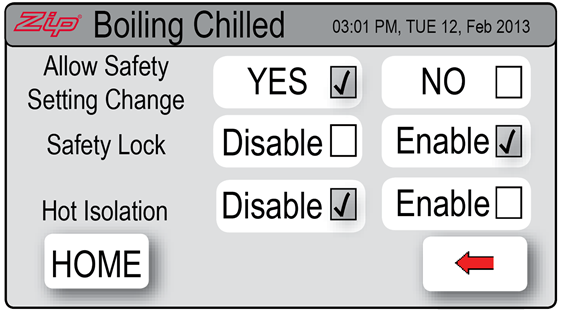
Step 6: To protect your settings, go back to the top of the screen and select "No". This means your current settings can only be changed by coming back to this screen and selecting "Yes" as in Step 4. Press Home button to advance to Home screen.
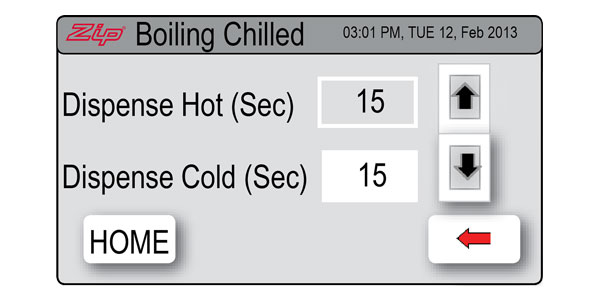
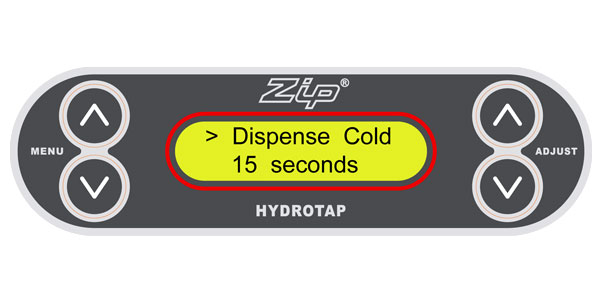
The default setting for the dispense time is 15 seconds but this can be adjusted to any time in between 5 and 15 seconds in increments of one second.
Step 1: Press the [MENU Λ or MENU V] button until [Dispense Hot] is displayed.
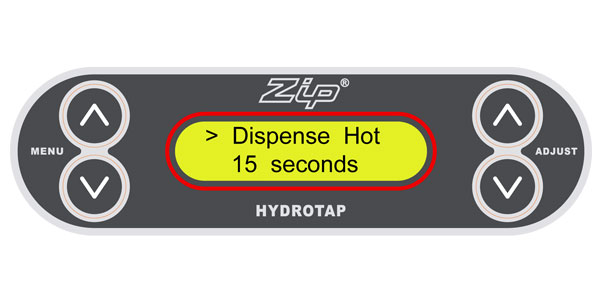
Step 2: Use the [Adjust Λ or ADJUST V] keys to select the required dispensing time for hot water.
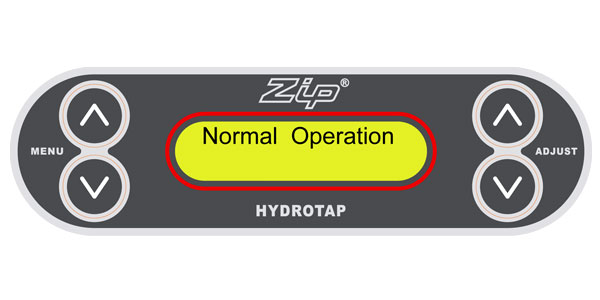
Step 3: The screen will return to [Normal Operation] after approximately 10 seconds.
Step 4: To set the cold water dispense time, repeat the procedure and at Step 1 press the [MENU Λ or MENU V] button until [Dispense Cold] is displayed.
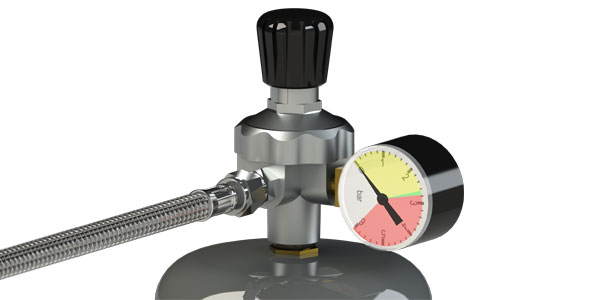
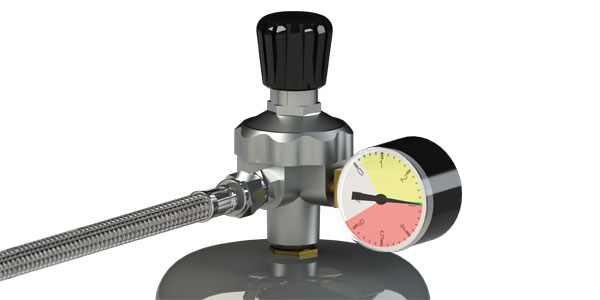
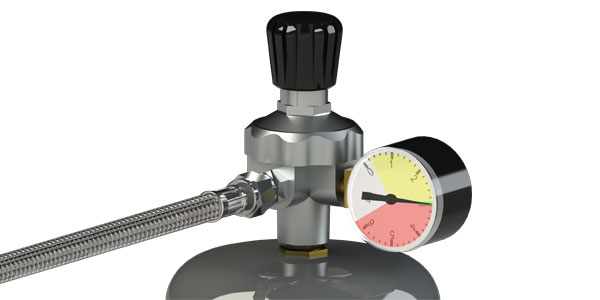
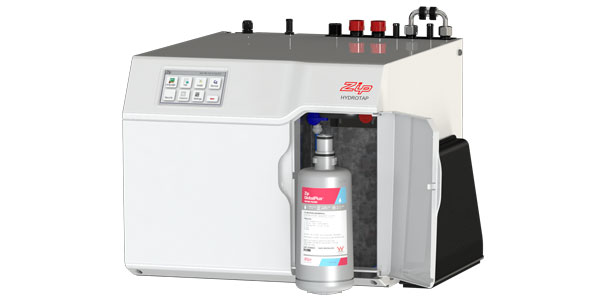
If your sparkling water is coming out of the tap flat it might be time to change your CO2 cylinder. First, check the regulator pressure gauge located on the cylinder to see where the needle is pointing. If it is down towards the left in the yellow zone, adjust the knob on the top of the bottle. If the needle doesn’t go back to the green zone then the cylinder will need to be changed.
Zip part number 91295 (2 x cylinders of 1000 grams of CO2). Note – safety glasses and gloves should be worn and have a towel handy. Take care when fitting or removing the regulator from the bottle.
If you are unsure about changing a CO2 cylinder, a qualified Zip service technician would be happy to assist. Call 0345 6 005 005 to schedule an appointment.
Step 1: First you will need to turn the CO2 cylinder regulator off. Do this by twisting the knob anti-clockwise until it screws up and away from the bottles.
Step 2: It’s important to start the CO2 purge to relieve any pressure in the CO2 line. On the on-screen menu, press the [MENU Λ or MENU V] button until [CO2 Purge OFF] is displayed. Press [Adjust Λ] to start the CO2 purge, [CO2 Purge ON] will be displayed. The gas flow will slow and then stop. Press [Adjust V] to stop the CO2 purge.


Step 3: Remove the bottle from the cupboard and disconnect the regulator by unscrewing it from the bottle. The braided hose can be left attached to the regulator.
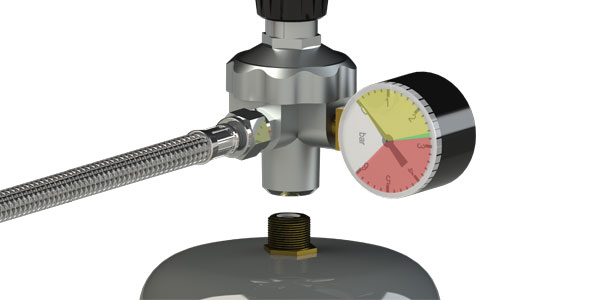
Step 4: The regulator and hose assembly needs to be fitted to the new gas bottle. Do this by screwing the new regulator in place. Be aware some CO2 may be discharged from the cylinder as the regulator is attached so make sure the bottle is upright at all times.
Step 5: Slot the bottle back into place in an upright position securing it with the fixing strap.
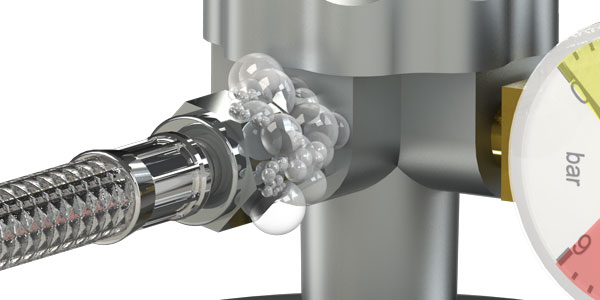
Step 6: Turn the CO2 cylinder regulator on by twisting the knob slowly clockwise. Watch the needle on the gauge carefully and keep twisting the knob until the gauge indicates 3.0-bar in the Green zone on the dial
Step 7: It’s important at this stage to check for gas leaks so take a soapy sponge and allow some soap suds to fall on the regulator fitting and hose. Watch carefully for any movement or an increase in bubbles – this may indicate a leak. If you spot a leak, twist the knob back in an anti-clockwise direction (turning the regulator off).
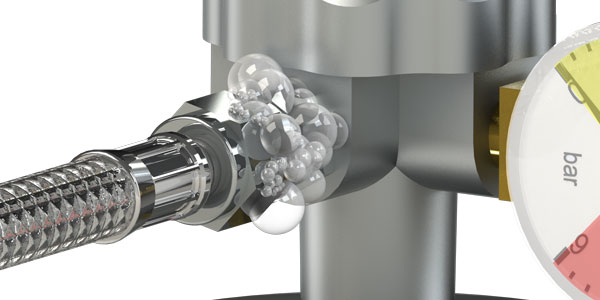
Go back to Step 4 and repeat. Wipe off suds and repeat the checking process. Only proceed to Step 8 when no leaks are detected. If further assistance is required please call Zip Customer Care on 1800 460 222. (image showing suds on regulator)
Step 8: Next you need to purge the gas lines to ensure the new CO2 cylinder will work efficiently. The LED screen should still be showing the CO2 Purge screen from Step 2. Press [Adjust Λ] to start the CO2 purge, [CO2 Purge ON] will be displayed. This will push CO2 and water through the HydroTap’s system.
Step 9: Let the CO2 flow until the water has finished and only CO2 is being dispensed from the tap. Leave the CO2 flowing for 5-10 seconds longer, then press [Adjust V] to stop the CO2 purge.
Step 10: Press the [MENU Λ] button and your unit will return to [Normal Operation] in approximately 10 seconds.
It’s a good idea to dispense some sparkling water from the tap and perform a taste test. There may be a small burst of gas pressure when you perform this task but if you let the levers go then press again, the unit should work normally.
Step 11: Residential HydroTap cylinders are non-refillable but can be recycled at most council recycling facility. Please do not place in council bin but dispose of thoughtfully. If a Zip technician changes your cylinders, they will remove the old cylinder and recycle it for you.
If your sparkling water is coming out of the tap flat it might be time to change your CO2 cylinder. First, check the regulator pressure gauge located on the canister to see where the needle is pointing. If it is down towards the left in the yellow zone, adjust the knob on the top of the bottle. If the needle doesn’t go back to the green zone then the cylinder will need to be changed.
Zip part number 91295 (2 x canisters of 1000 grams of CO2). Note – Safety glasses gloves or a towel and care should be used when fitting or removing the regulator from the bottle.
If you are unsure about changing a CO2 cylinder, a qualified Zip service technician would be happy to assist. Call 0345 6 005 005 to schedule an appointment.
Click here to view a video.
Step 1: First you will need to turn the CO2 cylinder regulator off. Do this by twisting the knob anti-clockwise until it screws up and away from the bottle.
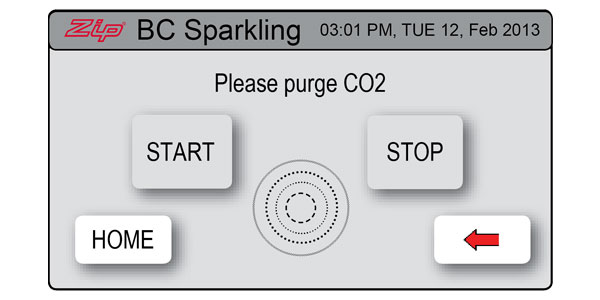
Step 2: Before removing the regulator from the bottle, start the CO2 purge to
relieve any pressure in the CO2 line. On the screen menu select [Install]then [CO2 Purge], then [Start].


Step 3: Gas flow will start, then slow and stop. When gas flow has stopped, press [Stop]. You may leave the display in this mode.
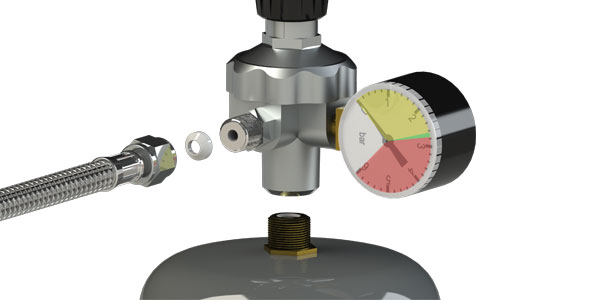
Step 4: Remove the bottle from the cupboard and disconnect the regulator by unscrewing it from the bottle. The braided hose can be left attached to the regulator. If removal of the hose to regulator is required take care not to lose the plastic olive inside the braided hose.
Step 5: The regulator and hose assembly needs to be fitted to the new gas bottle. Do this by screwing the new regulator in place. Be aware some CO2 may be discharged from the cylinder as the regulator is attached and always make sure the bottle is upright.

Step 6: Slot the bottle back into place in an upright position securing it with the fixing strap.
Step 7: Turn the CO2 cylinder regulator on by twisting the knob slowly clockwise. Watch the needle on the gauge carefully and keep twisting the knob until the gauge indicates 3.0-bar, in the Green zone on the dial

Step 8: It’s important at this stage to check for gas leaks so take a soapy sponge and allow some soap suds to fall on the regulator fitting and hose. Watch carefully for any movement or increasing bubbles in suds that would indicate a leak. If you spot a leak, twist the knob back in an anti-clockwise direction (turning regulator off) and rectify leak. Wipe off suds and repeat the checking process. If all ok proceed to next step. If further assistance is required please call ZIP Customer Care on 0345 6 005 005.
Step 9: Next you need to purge the gas lines to ensure the new CO2 cylinder will work efficiently. If your screen is not showing the CO2 purge screen, press the [MENU] button to bring up the main menu. Press the [Install] button then press [Purge CO2].

Step 10: When the next screen comes up, press the [START] button. Water will begin to flow through the HydroTap. If a font is fitted, a bucket or bowl to catch water flow from tap may assist.
Step 11: When the water appears to have stopped flowing and only CO2 gas is escaping through the tap, wait another 10 seconds then press the [STOP] button to end the purge. Dispose of the purge water in the sink.

Step 12: Press the [] button to go back to the previous menu or press [HOME] to return to the home screen.
Step 13: It’s a good idea to dispense some sparkling water from the tap and perform a taste test. There may be a small burst of gas pressure when you perform this task but if you let the levers go then press again, the unit should work normally.
Step 14: Residential G4 HydroTap cylinders are non-refillable but can be recycled at most council recycling facility. Please do not place in council bin but dispose of thoughtfully. If a Zip technician changes your cylinders, they will remove the old cylinder and recycle it for you.
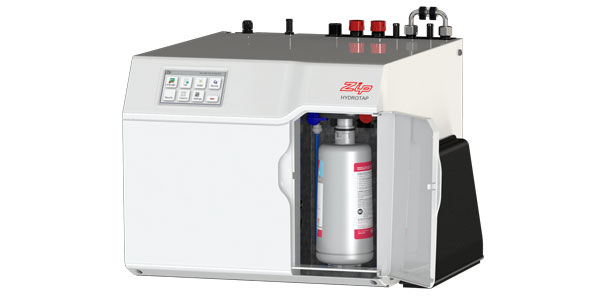
Your Zip HydroTap will notify you when the filter replacement is due. The change filter light will flash white once per minute until the filter has been replaced, and the filter percentage will show 0% on the Home screen.
Step 1: Grab an empty bucket or container to collect the water which will be flushed through the system and an old towel to mop up any spills.
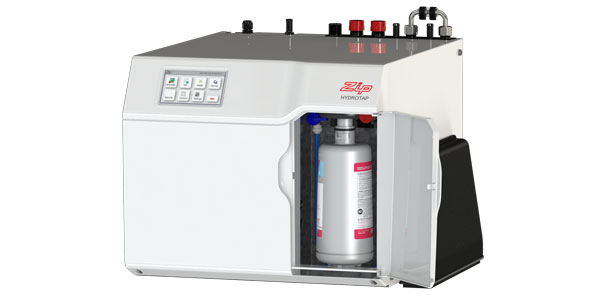
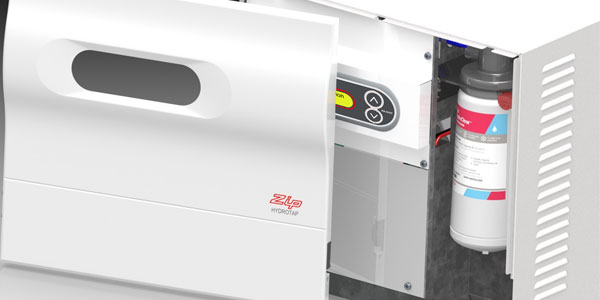
Step 2: Open the filter access door on the front of the HydroTap Command Centre. You will see the filter cartridge in front of you.

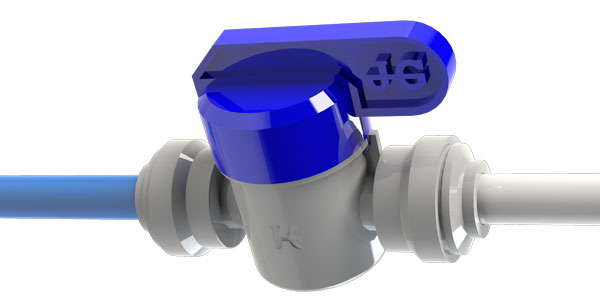
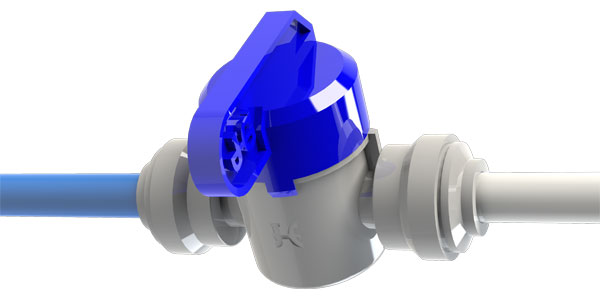
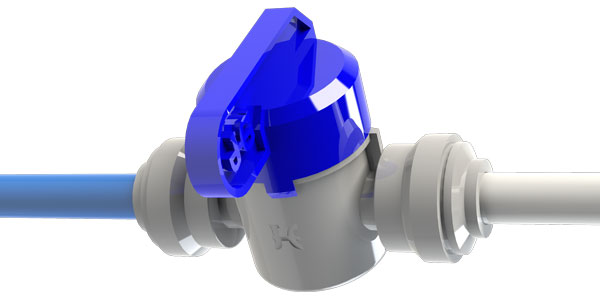
Step 3: Reach to the rear right hand side of the cartridge and you’ll find a flush line (looks like a hose) which is around 60cm long which will be sealed with a stop cock located in the centre of the hose. Place the free end of the flush line into the empty bucket or container. Turn the stop cock quickly on then off to relieve system pressure.

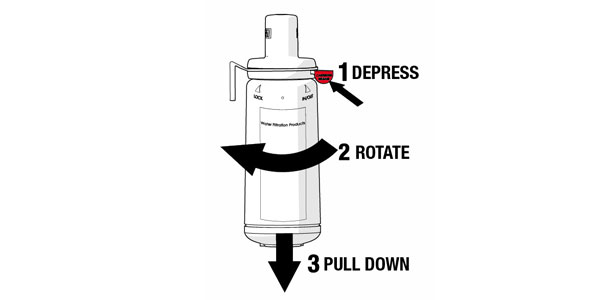
Step 4: Gently hold the filter cartridge then press the red lever at the top right of the unit and rotate the cartridge a quarter turn to the left. The unit should detach and you should be able to pull it free in a downwards motion. Some water may drip from the cartridge at this point. Be sure to keep the cartridge level to avoid spills.
Step 5: Place spent cartridge in the sink or other suitable container.
Step 6: Unpack your replacement cartridge and remove the sanitary cap. Write today’s date where shown on the label. Ensure you avoid touching the O-rings or filter opening as this can cause bacterial contamination of the cartridge.
Step 7: Slightly moisten the O-rings with regular tap water and line up the front cartridge label to the left.
Step 8: Gently but firmly push the cartridge up into the filter head and turn a quarter-turn to the right – as far as it will go without forcing it. The cartridge should now be locked in position with the front label facing forward.

Step 9: Press the [MENU] button to bring up the main menu on the screen.
Step 10: Press the [Install] button and turn the stop valve ON by rotating the lever clockwise until it is in line with the hose.

Step 11: Press the [Filter Flush] button then press [Start] to begin the process. Ensure you run at least 10-litres of water through to flush the filter of excess black carbon particles.

Step 12: When the filter flush is finished, turn the stock valve OFF by rotating the lever anti-clockwise until it is perpendicular to the hose.

Step 13: Press [Stop] to end the filter flush process.
Step 14: Press the [Home] button to return to the home screen.
Note: If you are carrying out this flush after the HydroTap’s initial installation, the unit will go directly into calibration mode after the Filter Flush Mode is turned off. With any subsequent filter changes the system will automatically revert to the main menu.
Step 15: Dispose of used cartridge and packaging thoughtfully.
Your Zip HydroTap will notify you when the filter replacement is due. The change filter light will flash white once per minute until the filter has been replaced. The default replacement setting is 6000-litres but this can be personalised.
Grab an empty bucket if the filter flush hose does not reach your sink.
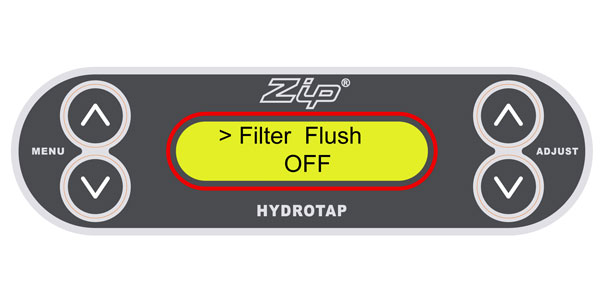
Step 1: Press [MENU Λ or MENU V] until you see [Filter Flush Off]. Select this option to automatically isolate the water supply.
Step 2: Open the left-hand door or front cover (for compact model) of the HydroTap Command Centre by lifting the locking tab. You will see the filter cartridge in front of you.
Step 3: Reach to the rear of the cartridge and you’ll find the filter flush hose. Place the free end into an empty bucket or sink to collect any water from the hose. Turn the stop valve on to relieve any pressure.
Step 4: Gently hold the filter cartridge and press the red lever at the top right of the unit. Rotate the cartridge a quarter turn to the left. The filter should detach and you will be able to pull it free in a downward motion. Some water may drip from the cartridge at this point. Be sure to keep the cartridge level and wipe up any spills.
Step 5: Place spent cartridge in the sink or other suitable container.
Step 6: Unpack your replacement cartridge and remove the sanitary cap. Write today’s date where shown on the label. Ensure you avoid touching the O-rings or filter opening as this can cause bacterial contamination of the cartridge.
Step 7: Slightly moisten the O-rings with regular tap water and line up the filter.
Step 8: Gently but firmly push the filter up into the filter head and turn a quarter-turn to the right – as far as it will go without forcing it. The cartridge should now be locked in position with the front label facing forward. Once in position the filter will not move unless the red button is pushed again.
Step 9: Ensure the filter flush stop-valve is still open and firmly hold the end of the hose in the bucket or sink.

Step 10: [Filter Flush Off] displayed from Step 1, press [Adjust Λ]. This will start the flow of water. Allow at least 12-litres of water to flush through the cartridge. This will take approx. 3 minutes. Press [Adjust V] to finish the filter flush.
Step 11: Turn the stop valve to OFF by rotating the lever anti-clockwise until it is at 90 degrees to the hose. Put the hose back behind the filter cartridge.
Step 12: Scroll through the menu until you see “Litres Filtered”. Press [Adjust Λ] to re-set the litre counter. When asked “are you sure?” press [Adjust Λ] to confirm the command.

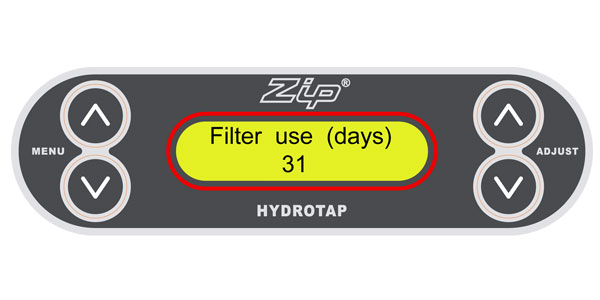
Step 13: Scroll through the menu until you see “Filter Use (Days)”. Press [Adjust Λ] to re-set the timer. When asked “are you sure?” press [Adjust Λ] to confirm the command. After approx. 10 seconds the unit will default to the selected mode. The white filter light on the HydroTap should now stop flashing.
Step 14: Close the door or replace the cover and dispose of used filter and packaging in general waste.
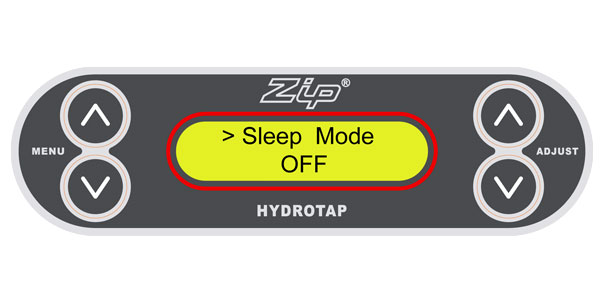
Energy modes are used to help the HydroTap G3 save energy. There are two options available: “Sleep” mode and “On/Off” mode.
• In “Sleep” mode the unit will power down after a period of inactivity. You will know the unit is in this mode when the home screen status window says “Program in off cycle ”.
• In “On/Off” mode you can set the unit to turn on or off at a particular time.
To activate “Sleep” mode
Step 1: Press the [Menu ^] button until “Sleep Mode” is displayed.
Step 2: Press the [Adjust ^] button to select the sleep mode required.
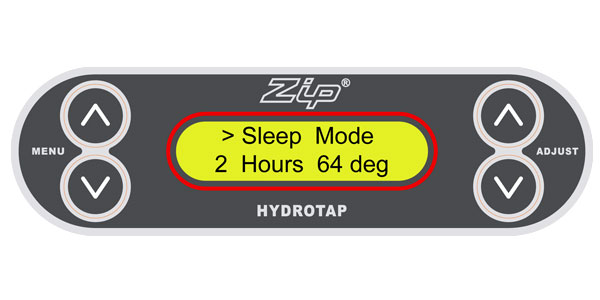
Option1: ( 2hrs/64 degrees) Boiling water temperature will gradually drop to 64˚C after 2 hours of inactivity but the chiller will remain ON. Unit will wake up once the boiling lever is activated and heat to the set temperature.
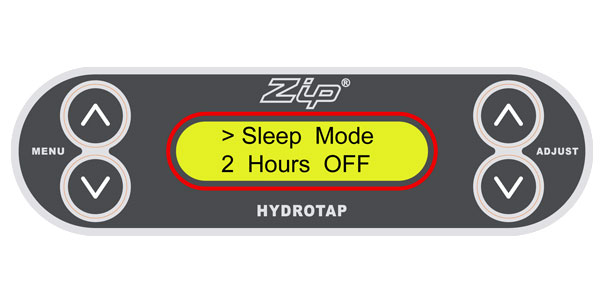
Option 2: (2hrs to Off) Boiling and chilled water temperature will gradually drop to room temperature after 2 hours of inactivity. The boiler and chiller will remain OFF*.
If no “Off “ times are set and sleep mode is off, the HydroTap will operate 24 hours/7 days.
*Note: If the unit has gone into any one of the sleep modes you can “wake” it upsimply by dispensing water. You will need to allow enough time for the water to come back to your selected temperature after you “wake” it up.
To activate “On/Off” mode
If you wish to use the “On/Off” mode you must also set your current date and time. Click here for instructions on how to set the date and time.
Step 1: Press the [Menu ^] button until you see “Monday On”

Step 2: Press the [Adjust ^] button until the required time for the unit to turn on is reached.
Step 3: Press the [Menu ^] button once and “Monday Off” will be displayed.
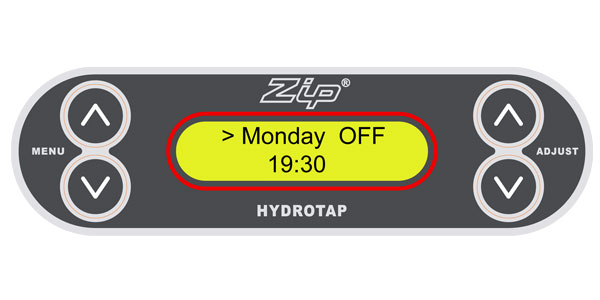
Step 4: Press the [Adjust ^] button until the required time for the unit to turn off is reached.
Step 5: Repeat steps for all other days you wish to set personalised times for the unit to turn on and off.
Note: If the unit is in OFF mode you can “wake” it up simply by dispensing water. The unit will automatically return to the selected OFF mode after 30 minutes of inactivity. You will need to allow enough time for the water to come back to your selected temperature after you “wake” it up.
If you go away for an extended period, Zip recommends you turn off your G3 HydroTap to save water and energy. If you have a Sparkling G3 HydroTap please use instructions here
To Turn OFF
Step 1: Turn the water off at the supply.
Step 2: Depress the levers on the HydroTap three or four times until the water stops. This will empty the tanks.
Step 3: Turn off power supply at the power point.
To Turn ON Step 1: Turn on water supply at supply point. Turn on power supply at power point. Note: any programmed times will be retained via the battery backup and will not need to be re-set.
Step 2: Go to the command centre, scroll through the menu with [MENU Λ or MENU V] keys on left of screen and navigate to [Filter Flush].
Step 3: Open the filter flush stop-valve and ensure the end of the hose is in a bucket or the sink. 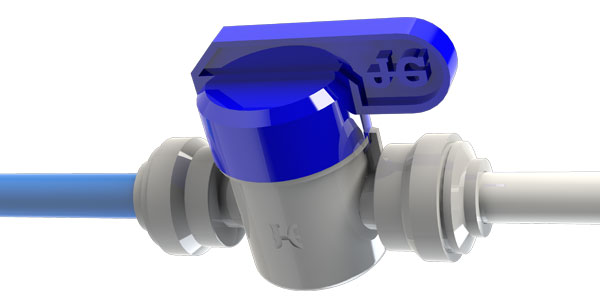
Step 4: Press [Adjust Λ] to the right of the screen, this will start the flow of water and [Filter Flush – ON] will be displayed. Flush for 30 seconds to remove any water sitting in the filter cartridge.

Step 5: Once the filter flush completed, turn filter flush [OFF] by pressing [Adjust V], then turn Stop Value to OFF by rotating the lever anti-clockwise until it is at 90 degrees to the filter flush hose. Put the hose back into the filter compartment.
Step 6: Press[MENU Λ or MENU V] to exit the Filter Flush screen. Your unit will return to normal operation after approximately 10 seconds.
zipwater.co.uk
© 2026 Zip Industries
Talk to us about your next project, request a brochure or arrange a full product demo with one of our team.